Showing posts with label Markers. Show all posts

Thursday, July 21, 2011

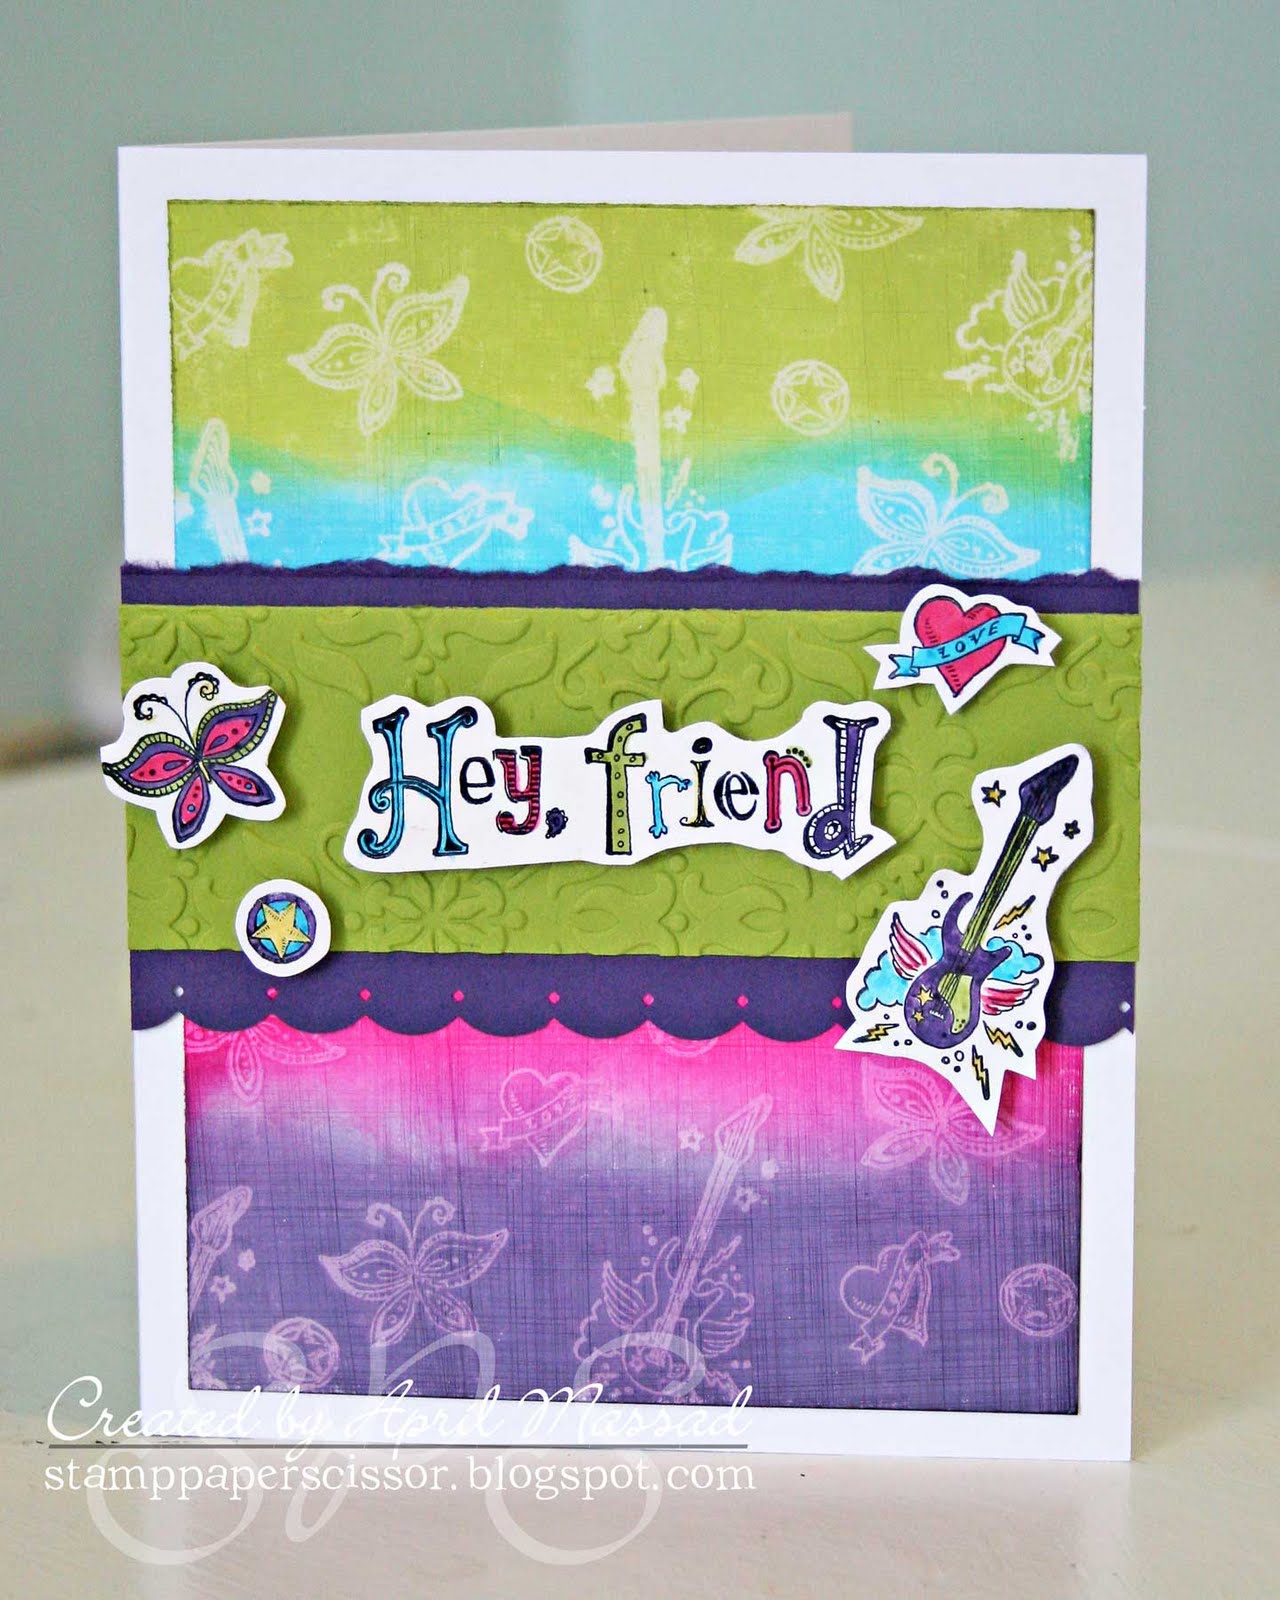
Hey Friend - Combined Techniques

Hey friend! The weekend is right around the corner! Woohoo!
Today I'm sharing a card that I have combined the Versamark Resist technique and the Faux Denim/Linen technique on. The stamp set I used is called Friends Rock and it's retired. You can buy my used Friends Rock set HERE or the current stamp sets Best Friends Forever or Grunge Rock would be perfect for this card!
Supplies and instructions for making this fun card are listed below!
Supplies:
- 5x6.5 inch white card base
- 4.5x6 inch piece of glossy cardstock
- 1.75x5 inch piece of Lucky Limeade carstock
- 3x5 inch piece of Elegant Eggplant carstock
- Glossy cardstock for stamped and colored elements
- Vintage Wallpaper Embossing Folder
- Friends Rock Stamp Set
- Border Punch
- Versamark
- Ink pads in Lucky Limeade, Tempting Turquoise, Elegant Eggplant, Melon Mambo
- Stazon in Black
- Markers in Daffodil Delight, Lucky Limeade, Tempting Turquoise, Elegant Eggplant, Melon Mambo
- Sandpaper or sanding block
- Sponges or ink applicators

Instructions:
1. Take your large piece of glossy cardstock and stamp your images randomly all over the piece with Versamark ink. Allow to dry or heat with a heat gun until dry.
2. Take your glossy cardstock and sand in straight lines horizontally and then vertically from top to bottom. (This will give you the linen texture)
3. Take your ink and ink the glossy cardstock with your sponge starting at the bottom with the Elegant Eggplant and working your way to the top of the cardstock with different colors. Keep going over it with the sponge and work in circular motions to wipe the ink from the stamped images. This will make the images pop and become lighter. Set aside to dry.
4. Attach the inked piece of glossy carstock to the front of your card base.
5. Take your piece of Elegant Eggplant cardstock and border punch along the bottom. (Optional: Rip along the top of the cardstock so it will be close to 2.5 inches wide.)
6. Take your piece of Lucky Limeade cardstock and emboss it with the Vintage Wallpaper embossing folder. Adhere to the piece of Elegant Eggplant and adhere to the front of the card.
7. Stamp the desired images and sentiment onto glossy cardstock with the black Stazon ink. (Stazon is a permanent ink and will not bleed while coloring with the markers.) Color the stamped images and cut out. To make the color darker on the glossy carstock simply color over it again with the same color until the desired darkness is achieved.
8. Adhere the images and sentiment to the front of the card using foam adhesive squares.

This card is so much fun to make! You could change up the colors and make it a boy card! Any of the sports stamp sets would make perfect backgrounds! The possibilites are endless!
If you have any questions about this card simply email me at aprilmassad@yahoo.com or comment here!
To purchase the Stampin Up products in this post contact your Stampin Up deomstrator or go HERE.

Thursday, May 19, 2011

Flowers Flowers Flowers

I LOVE flowers! They are all over my back porch, on my front porch, and around my pool. Every year I can't wait for springtime to bring them all back out and plant new ones!
Creating Keepsakes Scrapbooking Tips and Tricks came out at the perfect time! This issue is ALL about flowers. While this blog is my cardmaking blog that doesn't mean you can't take an idea from a scrapbooking layout and translate it into your cardmaking! Flowers look beautiful on ANY project! ;)
My layout in this issue is for the Latest and Greatest column. They sent me some goodies and I had to make scrappy magic with them. I can't post the whole layout on here, but I will give you a sneak peek!
The sneak peek pic above is of a clothespin I added to the layout to hold Brodey's note. (I wanted it to be removable since it's a keepsake.)
I used the Punch Potpourri stamp set and stamped the flowers onto the clothespin with brown Stazon ink. I then took my markers and blender pens and colored in the flowers. I attached the clothespin to my layout with Glue Dots. I thought it was a fun way to add memorabilia to a layout and it's always fun to color flowers!
To celebrate the flower issue I made a card with some fun tissue flowers! We first made a tissue flower card in my March Stamper's Night Out. For that card I used the smallest flower in the Island Floral die for my Big Shot.
For today's card I used the Daisies #2 die. I LOVE this die! There are three different sizes of daisies on it! Remember that with the Big Shot you can cut just about any type of material out! It's AWESOME!
This card is very simple to make so I'm just going to give you the directions for making the flower. (If you need directions for the entire card sent me an email at aprilmassad@yahoo.com)
Here are the stamp sets and ink colors I used on this card:
Four Frames - Melon Mambo and Pretty in Pink Frame Around the Sentiment
Sincere Salutations - Old Olive Best Wishes
Love and Care - Melon Mambo, Pretty in Pink and Old Olive Flowers
Supplies Needed to Make Flowers:
- Big Shot Die Cutting Machine
- Daisies #2 Die (or any flower die)
- Light Pink Tissue Paper (Largest and smallest flowers)
- Dark Pink Tissue Paper (Medium flower)
- Scrap Paper
- Circle Punch
- Paper Piercer or Small Hole Punch
- Brad

Directions:
1. Take your tissue paper out of the package but DO NOT separate the sheets. (By keeping the sheets together you can cut all of one flower size at once)
2. Cut a square out of the pieces of tissue paper close to the size of the largest flower in the die. Lay the square of tissue paper over the flower and run through your Big Shot.
3. Repeat with the two other sizes of flowers.
4. Take the smallest flower and begin separating the tissue paper with your fingers. It's easier to do this by just rubbing the center of the flowers between your fingers. As you separate each flower, feed it onto a pencil, paper piercer, or paintbrush. (This helps them stay centered and keeps them from blowing away)
5. Repeat with the other sizes of flowers.
6. Punch a circle out of scrap paper the size closest to the flower you are using. (I used all three flower sizes in the die so I punched out a 1 inch circle.)
7. Punch or pierce a hole into the center of your circle.
8. Slide the tissue flowers off and put the punched circle on the back of the flowers. Feed your brad through the hole to hold your flowers onto the circle base.
And now you have a beautiful Gerbera daisy!
I hope your Thursday has been a happy one!

P.S. I just wanted to let you know that if you scroll down my blog, on the right side there is a product index. There are products, colors, stamp sets, etc that you can click on and see what projects I have shared using those items! This might be helpful when you get that stamp set in your hands and you can't kick your creative side into gear! ;)

Wednesday, May 18, 2011

You ROCK!


No YOU rock! ;) Metal is FUN! And I don't mean heavy metal...hardy har har!
Monday I shared with you a Father's Day Card and a How To on faux metal background! It's super fun and super easy!
Today's card is for the tween, the teen, the birthday girl, or whatever rockstar in your life!
Supplies:
- 4x5.5 White Card
- 3.5x5 Faux Metal Sheet (Instructions HERE)
- Two Embossing Folders of your choice
- 3x4 Piece of Rose Red Cardstock
- 2x4 Piece of Rich Razzleberry Cardstock
- Rose Red Ink
- Stazon Ink in Black
- Markers in Daffodil Delight, Rose Red, Rich Razzleberry, Tempting Turquoise
- Blender Pens
- Watercolor Paper
- Border Punch
- Decorative Label Punch
- Stampin Dimensionals/Foam Adhesive Squares
- Friends Rock Stamp Set

Directions:
1. Take your Rose Red ink and ink around the edge of the card front. (Optional)
2. Emboss your faux metal sheet. Apply adhesive to the card front and adhere the faux metal sheet. (Applying your adhesive to the card front instead of the embossed sheet will prevent you from smashing your embossed design)
3. Take your piece of Rose Red cardstock and punch with a border punch.
4. Emboss the piece of Rich Razzleberry with the embossing folder of your choice. Adhere this on top of the piece of Rose Red. Adhere to the card.
5. Stamp your sentiment, star, heart, butterfly, and guitar onto watercolor paper with Stazon Ink. (You must use Stazon Ink for the outline to be permenant)
6. Color your images and sentiment with your markers and blender pens. Cut your images out with scissors and punch your sentiment out with the Decorative Label punch. Ink the edges of your punched sentiment with Rose Red ink.
7. Adhere your sentiment and images onto your card with Stampin Dimensionals.

This rockin' card takes no time to put together! Plus this stamp set is so much fun to color! By simply changing the colors this could be a masculine card!
Well I hope you like today's card!
Tomorrow I'll be sharing a sneak peek of a layout I have in the new Scrapbooking Tips and Tricks issue where I used the Punch Potpourri Stamp Set! This issue is FILLED with fabulous flower ideas! AND since YOU ROCK....I'll be giving a copy away!
So be sure to tune in tomorrow!

Wednesday, May 11, 2011

Sunny Thanks!

Well it WAS a beautiful sunny Oklahoma day, but then severe storms decided to roll through! Now it's a cool 62 but I'm still in 80 and sunny mode so I'm posting this cute card!
This super cute card was made with the Sunny Fun stamp set from the new Summer Mini Catalog!
To color the sweet kiddos I used Blender Pens and Markers! To make the pretty turquoise sky and water I used my Tempting Turquoise ink pad, squished ink into the lid, and picked it up with my Aqua Painter.
The cardstock accent flowers were punched with the Blossom Bouquet Triple Punch and the Boho Blossoms Punch.
This is such a fun stamp set! I had a hard time deciding whether to use the flip flops, popsicles, or kiddos!
If you have any questions about this card send me an email at aprilmassad@yahoo.com!

Thursday, March 10, 2011

Go Green!

Howdy folks!
I just love the color green! I think it might be my favorite color! I especially love it when the grass starts to turn green! Springtime is my favorite season and St Patrick's Day is right around the corner!
At my Stamper's Night Out Tuesday we made these adorable little St Patrick's Day baskets! They are the perfect size to hold some of the fun little chocolate coins! I brought my sewing machine and let the girls sew their baskets and I think they enjoyed it! Sewing on paper projects is easier than you think! I think it's actually easier than sewing on fabric!
To make this sweet basket you will need:
Big Shot Machine
Baskets and Blooms Die
Vintage Wallpaper Embossing Folder
Lucky Shamrock Stamp
Circle Punch
Markers (Daffodil Delight and Old Olive)
Shimmery White Cardstock
Kraft or Soft Suede Cardstock
Old Olive Cardstock
Decorative Label Punch
Crop-a-Dile
Satin Ribbon
Sewing Machine (Optional)


Directions:
1. Take a piece of your Kraft cardstock and position it so that you only cut out the two basket pieces.
2. Take your two die cut basket pieces and emboss them with the Vintage Wallpaper folder.
3. Adhere the two baskets pieces together OR sew around the three sides with your sewing machine. I used a zig zag stitch.
4. Take your Lucky Shamrock stamp and color it with the markers. Huff on the stamp to remoisten the image and stamp onto shimmery white cardstock. Punch the image out with the circle punch.
5. Use your Decorative Label punch to punch a label out of the Old Olive cardstock. Use your Crop-a-Dile to punch a hole in the top. Adhere the stamped circle onto the Old Olive label with a foam adhesive square.
6. Tie your label onto your basket with the satin ribbon.
7. Fill the basket with chocolate coins or other green goodies!


This is a fun, quick project that is so cute! The Big Shot die cut machine that I used to make this card is by far my favorite die cut machine! I have four different machines from four different companies and the Big Shot is by far the best, in my opinion! It will cut any dies that you might already have from other machines! I have several SNO ladies getting the machine and I will be doing Big Shot classes with them!
If you are interested in purchasing the Big Shot or have ANY questions about it or this card please don't be shy! Send me an email at aprilmassad@yahoo.com and I would be happy to answer your questions!
I have also set the date for our April Stamper's Night Out! It will be on April 12th at 6:30pm at the Scrappin Pad! More details to come!
With spring upon us SUMMER is right around the corner! That means Stampin Up's new Summer Mini Catalog will be popping up in mailboxes everywhere! If you would like to be one of the firsts to receive it simply send me an email with your mailing address ASAP! I would love to send you one!

Monday, March 7, 2011

Chocolate!


Hello all! I'm back from a little trip to Arkansas to visit my wonderful cousins!
Today I thought I would post a few simple little cards I made for the Habitat for Humanity Chocolate Festival we had a table at recently! We had a pretty table with all sorts of yummy chocolate items and I thought the Eat Chocolate stamp set was perfect! I made several sets of these cards and put them around the table! Everyone thought they were funny! If you click on the photo you can read what they say.
The colors I used were Pumpkin Pie, Tempting Turquoise, Melon Mambo, and Early Espresso. I also used several different border punches. They were quick and easy to make!
Well this will be a short post! I'm getting ready for my Stamper's Night Out tomorrow as well as catching up on laundry! ;)

Wednesday, February 23, 2011

It's a Girl!


Okay my friends...don't get too excited! I'm not preggers!! My wonderful friend Christie's daughter-in-law is! Congrats Ciara! Christie owns the Scrappin Pad which happens to be right down the road from my house! It's a wonderful scrapbook retreat where I teach classes! Christie is one awesome gal and if you ever want to stay at a beautiful CLEAN cute scrapbook retreat you should check it out! PLUS I could come and see you! ;)
She asked me to make Ciara's baby shower invitations and I was very excited to do so! Ciara chose the colors and she loved how they turned out.
I stamped and hand colored the little onesie and hearts from the Baby Bundle set. I love how they turned out! :)
So I'm sorry I have been absent for a while! I've missed everyone!
I have been wearing my scrapbooking hat and working on scrapbook layouts that you will see in Creating Keepsakes this summer!


Before I go I have to share this FUN blog award I received from Julie DiMatteo! I was so surprised to come back from my blog hiatus to see she awarded me the Cherry on Top Blog Award! Thank you so much Julie! You made my day! :)
So now I have to pass it on to 5 wonderful bloggers and list 3 things about myself!
Here are some fun bloggers:
1. Michelle Last
2. My friend Kris from SUDSOL
3. Patty Bennett
4. My Stampin Up Upline Kris
5. Amy Celona
Love your blogs girls! :)

So here are my 3 things!
1. My sweet hubby and I have been together for 18 years and have been married for 9! Our parents went to high school together(yes both of our parents were high school sweethearts as well) and we have known each other almost our whole lives. I used to go over to his house and play all the time. We were even boyfriend and girlfriend through many elementary and junior high school years.
I had a layout published about it a couple of years ago in CK.

2. I LOVE to cook almost more than I LOVE to eat! ;) I cook at least 6 nights a week. I share recipes sometimes on my personal blog, Scrap Happens.
3. It's near impossible to embarrass me. The only person that can achieve that is my son when he misbehaves in public! Luckily it doesn't happen very often!
I have no problem getting on stage or speaking in front of people. As a matter of fact my DREAM JOB is selling stuff on QVC!!
I LOVED being in theater in high school and college! No one would EVER describe me as shy....right Christi? ;)

Well I hope you enjoyed the invitation share today! If you have any questions about recreating it yourself just send me an email at aprilmassad@yahoo.com!
Please remember that Sale-a-Bration ends March 31st! If you want to host a Stampin Up night OR place an order let me know!

Thursday, February 3, 2011

Keep it Simple Day 2

The boys are still here! While I LOVE them being home I get way more accomplished when I'm alone! ;) So today I am sharing another super simple card.
I was uploading a photo to the gallery at Split Coast Stampers and this card by Emily Keaton caught my eye.

As soon as I saw it my light bulb came on. I LOVED the scored stripes at the bottom of the card, but what if I scored it on the opposite side and then used the skinny side of my marker to draw in the line? And that's where the inspiration for today's card came from!
It's very quick to make and you can personalize it with the All in the Family stamp set! The scored lines are difficult to see in the photos, but look so cute in person!

The color combo for my card is Tempting Turquoise, Old Olive, and Tangerine Tango. LOVE this color combo! It makes me think of summer!
Supplies:
All in the Family Stamp Set
Family Accessories Stamp Set
Sentiment from the Fun and Fast Notes Set
4x5.5 Inch White Card
Three Orange Brads
Score Pal or Bone Folder
Scallop Square Punches or Dies
Black Stazon
Markers in Blush Blossom(for skin), Old Olive, Tangerine Tango, and Tempting Turquoise
Watercolor Paper
Cardstock in Tempting Turquoise
Stamp-a-ma-Jig


Directions:
1. Stamp your little person onto a piece of watercolor paper using the Stamp-a-ma-Jig to line the stamps up. Color in with your markers.
2. Punch or die cut the person out with your square scallop punch or die.
3. Punch or die cut a larger scallop square from the Tempting Turquoise cardstock. Adhere the smaller square to the larger square with foam adhesive squares.
4. Take your card and score (outside up)at 0.5 inches from the bottom and two more lines at .25 inches apart. Use the skinny end of your markers to draw a line in the scored lines of the card. (This is best done while your card is still on the Score Pal.)
5. Ink the sentiment only from the birthday stamp in the Fun and Fast notes set. Stamp on the card right above the highest scored line. Outline with the skinny end of the Old Olive marker.
6. Add three orange brads just below the sentiment between two of the scored lines.
7. Adhere your scalloped squares to the card.


This card was a ton of fun to make and the kids LOVE having a card with a cartoon look alike! ;) You don't even have to make it a birthday card! That stamp set has a ton of different accessories with it! The possibilities are endless!
Well I'm headed back into the scrapbook room to try and finish a layout! We will see how that goes!
If you have any questions about this card send me an email at aprilmassad@yahoo.com!

Tuesday, January 18, 2011

Got Cupcakes?


Cupcakes are everywhere lately and I LOVE it! I mean who doesn't love a cupcake? Just typing about them makes me want to eat one! ;)
I made this fun birthday card with the Got Treats? stamp set! We used this set at my last Stamper's Night Out class to make a cute little mini milk carton with treats in it! I wanted to use the set today to make a card! The directions and supplies are listed below!
Directions:
1. Stamp the pedestal base from the On a Pedestal Stamp Set on a piece of Whisper White cardstock. Trim a piece of brown cardstock with the Pinking Hearts Border Punch and adhere at the top of the stamped pedestal. Top with a strip of Baja Breeze cardstock.
2. Use your markers to color the cupcake stamp from the Got Treats stamp set. Remoisten the inked stamp by huffing or blowing your breath on the stamp. Stamp the cupcake images above the cardstock pedestal. Stamp the candle from the On a Pedestal set on top of the stamped cupcakes.
3. Use the Heart to Heart paper punch to punch out small hearts from cardstock. Ink the edges of the hearts with your markers. Adhere to the stamped cupcakes.
4. Punch a piece of white cardstock with the Curly Label punch. Cut it in half and stamp with the Got Birthday word from the cupcake stamp. Adhere to the cardstock pedestal.
5. Add a square of Rose Red cardstock to the card. Cut out your stamped image and adhere over the square of Rose Red cardstock. Add the strip of Baja Breeze cardstock on the left side and overlap with a piece of lace.

Supplies:
-Markers in Baja Breeze, Rose Red, Elegant Eggplant, and Chocolate Chip
-Pedestal and Candle Stamp from the On a Pedestal Stamp Set
-Cupcake and Got Birthday Stamps from the Got Treats Stamp Set
-Pinking Hearts Border Punch
-Heart to Heart Punch
-Cardstock in Whisper White, Rose Red, Baja Breeze, and Kraft


The cupcake stamp I used on this card is super cut, but there are several other Stampin Up sets and products with cupcakes.

Sock Monkey Stamp Set 111550
Birthday Bakery 117034
Build a Cupcake Paper Punch 121807
Crazy for Cupcakes Stamp Set 111618
Create a Cupcake Stamp Set

They are ALL cute!!
Well I hope you like today's card!
If you have any questions please email me at aprilmassad@yahoo.com!
It's a COLD day here in Oklahoma! Stay warm!

Monday, January 17, 2011

I LOVE Color

Color is fun. Color is beautiful. Color is exciting!!! So why are people scared of it? ;)
I'll admit it can be intimidating sometimes to figure out that perfect color combination, but I have the perfect solution...Never fear! The Color Coach is here! Haha! I had to!
I love this thing! It has all the Stampin Up colors on one side and it has two different color combos on the other.
The color combos are awesome! I use this almost every time I make a card. I even used it today to make this fun card with the Love Defined stamp set.The colors I used for this card are Cajun Craze, Baja Breeze, Basic Gray, and Chocolate Chip! LOVE that color combo!
The directions and supplies for making this card are below.
Directions:
1. Take your Baja Breeze, Cajun Craze, and Basic Gray markers and color the hearts on the tree stamp. (Coloring three hearts at a time gives the tree a more unified look) Once you have the hearts colored, color the tree trunk with your Chocolate Chip marker.
2. Remoisten the inked stamp by huffing or blowing your breath on the stamp. Stamp the tree onto Whisper White cardstock and cut out with a scalloped square. Mat the scalloped square with Baja Breeze cardstock.
3. Color your LOVE stamp with the same markers and stamp onto Whisper White cardstock. Punch the LOVE out with your small oval punch and adhere to a large scalloped oval punched from your Cajun Craze cardstock.
4. Adhere your tree, LOVE oval, and two hearts punched from Cajun Craze and Baja Breeze cardstock to your card.
5. Punch the edges of your Baja Breeze, Cajun Craze, and Chocolate Chip cardstock with your decorative edge punch. Trim to fit your ribbon width.
6. Adhere your trimmed cardstock on top of each other, leaving a peek of the color at the bottom. Tie your ribbon across and you are done!


Supplies:
-Love Defined Stamp Set
-Stampin Right Markers in Basic Gray, Cajun Craze, Baja Breeze, and Chocolate Chip
-Small Oval Punch
-Scallop Oval Punch
-Small Hearts Punch


Well I hope you are having a marvelous Monday! Brodey is at school today learning about Martin Luther King, Jr. They were supposed to be out, but had to make up a snow day.
I hope you enjoyed today's card share! If you have any questions please send me an email at aprilmassad@yahoo.com! Remember you can shop for Stampin Up products 24/7 online HERE!

Tuesday, November 23, 2010

Scrap Card: Friends for the Long Haul

Do you scrapbook? I do! After I finish a page I always have little patterned paper scraps laying around. They are usually perfect size for a card and that's what I used for this little card today!
Supplies:
Greenhouse Gala Paper 117167
Cardstock 121077
Loads of Love Stamps 115022
Loads of Love Accessories 115024
Stampin Up Markers 119702
Blending Pen 102845
Perfect Polka Dotz Texture Impression 117335

What I love most about Stampin Up is that all of their colors match! I can find the exact marker, watercolor pencil, ink and cardstock to match my paper! That makes it so easy to ink any stamp to suite your project!
The Loads of Love stamp set I used on this card doesn't really go with the Greenhouse Gala paper, but since I inked it the colors to match the paper it is perfect!
The scraps on this card are from a layout I made today! It just might be a scrapbook class in the future! ;) Speaking of classes...if you were thinking of taking the Bag of Tags class next week you better sign up! It will be fun!
Oh I almost forgot to tell you!!! Stampin Up has jumped on the Black Friday sale week wagon and offered some AWESOME deals!!! Go to my website HERE and click on the link at the bottom that says ONLINE SPECTACULAR! Great deals on stamps, dies, supplies, and My Digital Studio software is half off! Also if you place an order of $150 or more your shipping is FREE! Check it out!
The next time you have scraps left over from a project you should whip up a little card! :)
I hope you have a terrific Tuesday!
If you have any questions feel free to email me at aprilmassad@yahoo.com!