Showing posts with label Glossy White Cardstock. Show all posts

Thursday, July 21, 2011

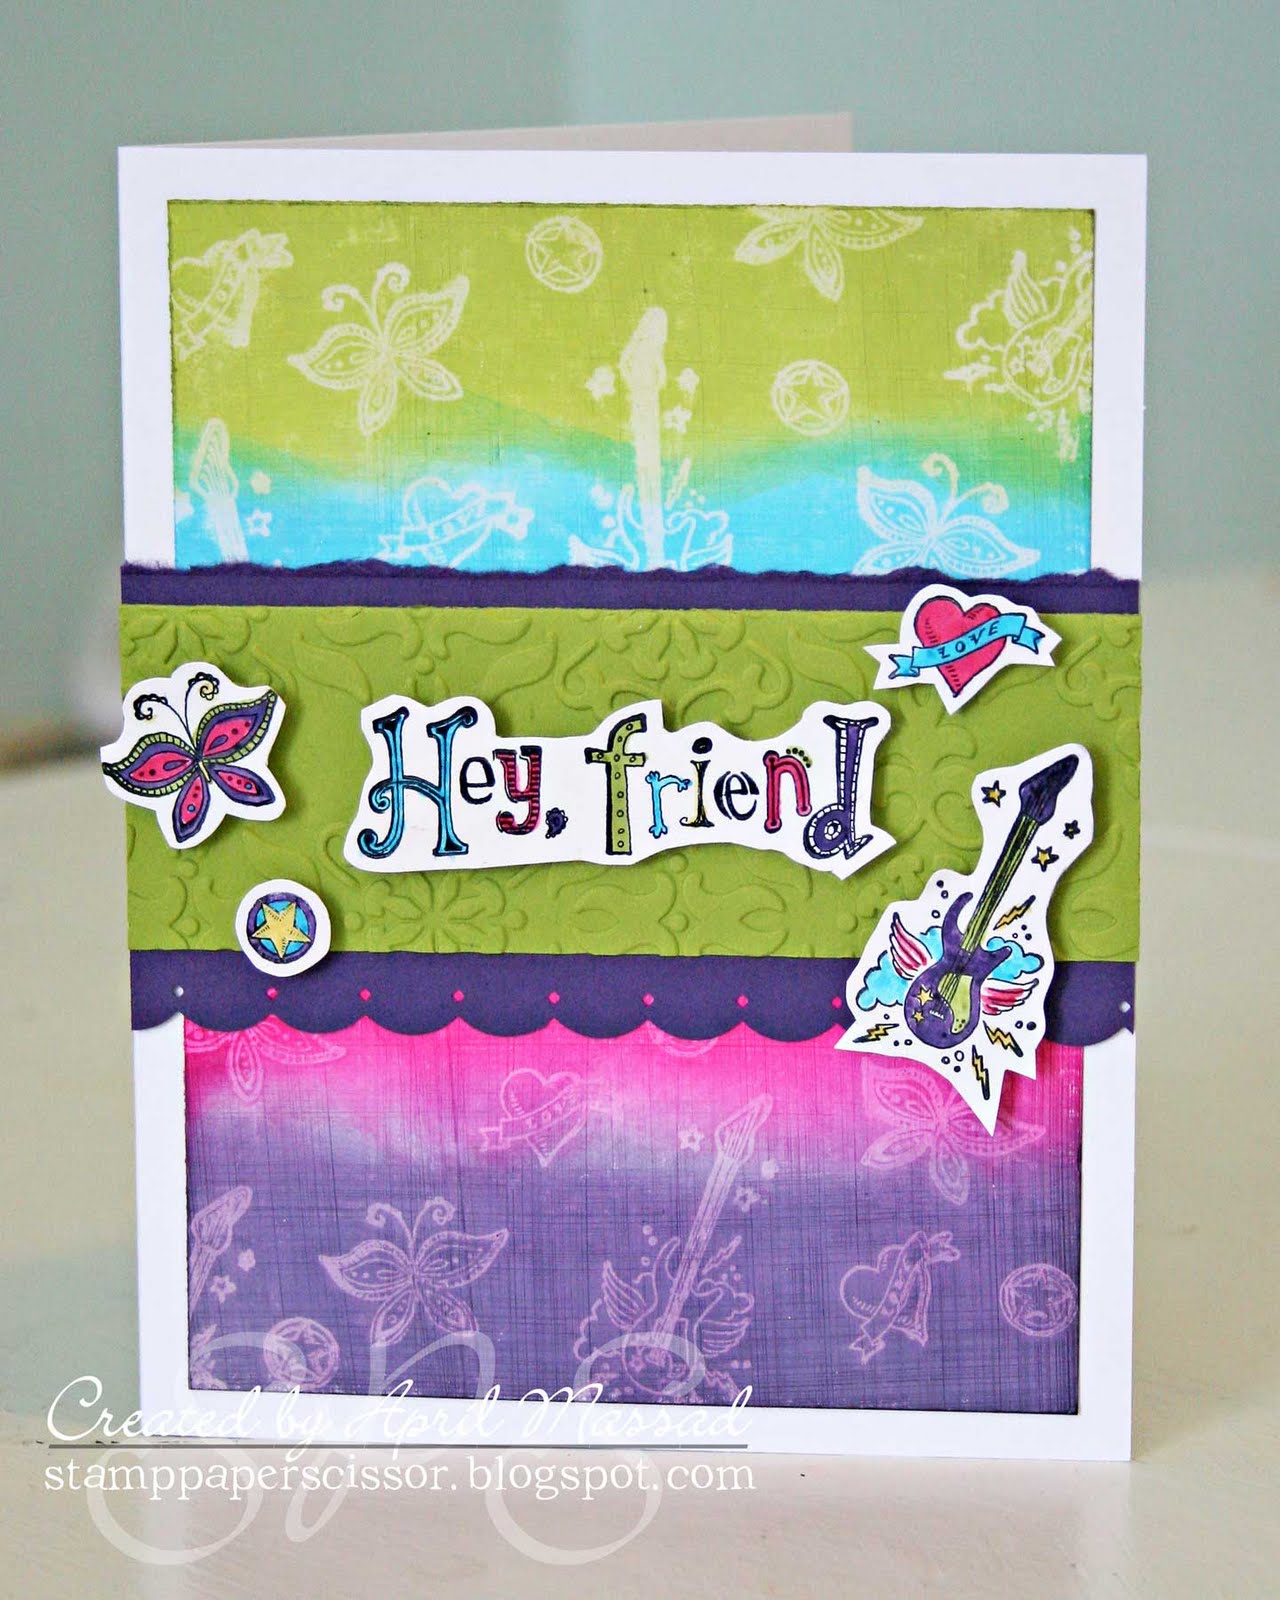
Hey Friend - Combined Techniques

Hey friend! The weekend is right around the corner! Woohoo!
Today I'm sharing a card that I have combined the Versamark Resist technique and the Faux Denim/Linen technique on. The stamp set I used is called Friends Rock and it's retired. You can buy my used Friends Rock set HERE or the current stamp sets Best Friends Forever or Grunge Rock would be perfect for this card!
Supplies and instructions for making this fun card are listed below!
Supplies:
- 5x6.5 inch white card base
- 4.5x6 inch piece of glossy cardstock
- 1.75x5 inch piece of Lucky Limeade carstock
- 3x5 inch piece of Elegant Eggplant carstock
- Glossy cardstock for stamped and colored elements
- Vintage Wallpaper Embossing Folder
- Friends Rock Stamp Set
- Border Punch
- Versamark
- Ink pads in Lucky Limeade, Tempting Turquoise, Elegant Eggplant, Melon Mambo
- Stazon in Black
- Markers in Daffodil Delight, Lucky Limeade, Tempting Turquoise, Elegant Eggplant, Melon Mambo
- Sandpaper or sanding block
- Sponges or ink applicators

Instructions:
1. Take your large piece of glossy cardstock and stamp your images randomly all over the piece with Versamark ink. Allow to dry or heat with a heat gun until dry.
2. Take your glossy cardstock and sand in straight lines horizontally and then vertically from top to bottom. (This will give you the linen texture)
3. Take your ink and ink the glossy cardstock with your sponge starting at the bottom with the Elegant Eggplant and working your way to the top of the cardstock with different colors. Keep going over it with the sponge and work in circular motions to wipe the ink from the stamped images. This will make the images pop and become lighter. Set aside to dry.
4. Attach the inked piece of glossy carstock to the front of your card base.
5. Take your piece of Elegant Eggplant cardstock and border punch along the bottom. (Optional: Rip along the top of the cardstock so it will be close to 2.5 inches wide.)
6. Take your piece of Lucky Limeade cardstock and emboss it with the Vintage Wallpaper embossing folder. Adhere to the piece of Elegant Eggplant and adhere to the front of the card.
7. Stamp the desired images and sentiment onto glossy cardstock with the black Stazon ink. (Stazon is a permanent ink and will not bleed while coloring with the markers.) Color the stamped images and cut out. To make the color darker on the glossy carstock simply color over it again with the same color until the desired darkness is achieved.
8. Adhere the images and sentiment to the front of the card using foam adhesive squares.

This card is so much fun to make! You could change up the colors and make it a boy card! Any of the sports stamp sets would make perfect backgrounds! The possibilites are endless!
If you have any questions about this card simply email me at aprilmassad@yahoo.com or comment here!
To purchase the Stampin Up products in this post contact your Stampin Up deomstrator or go HERE.

Monday, July 18, 2011

Thanks So Much - Versamark Resist and Glossy Cardstock

Well happy Monday stampers!
Today I am sharing another card I made using glossy cardstock! You will LOVE today's technique! It is so easy and SO cool!
This card also shows off Stampin Up's new 2011-2012 colors...which I LOVE! They are bright, cheery, and look so good together!
The technique I used on this card is called Versamark Resist. I know many of you have used this technique for years, but many of you have never heard of it! I thought I would give it a little twist today!
To keep it short and sweet I'm only going to give you instructions for doing the glossy panels. For the sentiment I used the Thanks So Much stamp from the Sincere Salutations set. I heat embossed it using white embossing powder. Behind the sentiment I put a strip of Pool Party cardstock punched with the Lace Ribbon Border Punch. The flower on the end of the sentiment strip is punched with the Blossom Bouquet Triple Layer punch.
If you have any questions about this card simply send me an email at aprilmassad@yahoo.com or comment below!
Supplies for Glossy Panels:
- Glossy Cardstock White
- Versamark Ink
- Sponges or Ink Applicators
- Circle Circus Stamp Set
- Ink in Pool Party, Calypso Coral, Wysteria Wonder, Lucky Limeade

Instructions:
1. Make sure the stamp set you choose to use is perfectly clean with no residue.
2. Cut your cardstock into 4 panels that fit your card size. (My card is 6.5x5 and my panels are 4.5x1.25 PLUS 2 millimeters)
3. Apply temporary adhesive to the backs of your panels and line them up on your stamping surface exactly as they will be on your card base. (My panels are about .25 of an inch apart)
4. Take your circle stamps and stamp with the Versamark as shown in the sample above.
5. Once you have stamped all of your circles allow the cardstock to dry or heat it with a heat gun until it's dry.
6. Take your sponge or ink applicator and apply your ink to the panels. (I ink in circulur motions) The more ink you apply the lighter the stamped areas will be. Just keep going over the panel with your ink until you get the desired affect.
7. Once all four panels are inked simply apply to your card base!
Yes it's as simple as that! I hope you enjoyed today's card!
Like I said if you have any questions please email me at aprilmassad@yahoo.com or comment below!
To purchase the Stampin Up products used in today's card you can contact your Stampin Up demonstrator or go HERE.
Enjoy the rest of your warm summer Monday!

Friday, July 15, 2011

Happy Birthday with Glossy Cardstock

Happy Friday to you!
Today I'm sharing a card I made using Glossy Cardstock! I shared a little bit about Glossy Cardstock in yesterday's post.
Glossy Carstock is basically white cardstock with a glossy layer on one side. It looks like photo paper that you print photos on, but it is NOT the same. (Trust me I've tried lol)
One of my favorite things to do is use sandpaper to give it texture! It might be difficult for you to scratch up that pretty glossy shine, but it's so much fun! It's kind of like being the first one out in a yard of freshly fallen snow! ;)
Here is a close up pic of the glossy cardstock.
I'm going to give you the directions for making the patterned glossy cardstock. If you have any questions about anything else on the card just send me an email at aprilmassad@yahoo.com or comment below.
Supplies:
- Glossy Cardstock
- Sandpaper (I used fine grit)
- Fine Flourish Stamp (Or any background stamp)
- Array of Sunshine Stamp Set
- Ink in River Rock, Calypso Coral, Baja Breeze, Perfect Plum, Certainly Celery, and Old Olive
- Scrap Paper to stamp off on
- Stamp-a-ma-Jig
- Sponge

Directions:
1. Take your Fine Flourish stamp (or any background stamp) and stamp all over your glossy cardstock using the Stamp-a-ma-Jig to line it up perfectly.
2. Take your sandpaper and sand in straight motions from top to bottom, and flip the cardstock and sand again from top to bottom. Sanding vertically and then horizontally will give the cardstock a fine linen texture.
3. Take your sponge and sponge the River Rock ink lightly around the edges of the cardstock and into the middle. The sanded areas will take the ink differently than the non-sanded areas and the cardstock will look like burlap.
4. Take the largest flower stamp and ink it with the Baja Breeze ink. Take your sponge and pick up some of the Certainly Celery ink. Ink into the middle of the flower and around the sides. Huff on the stamp the remoisten the ink and stamp onto the glossy carstock. Repeat and stamp again.
5. Ink the largest flower again with the Perfect Plum ink and sponge the stamp as you did with the Certainly Celery in step 4. Stamp onto the glossy cardstock.
6. Ink the large leaf stamp with the Old Olive ink, stamp off on a scrap piece of paper to mute the green, and stamp the leaf onto the glossy cardstock. Repeat and stamp two more times.
7. Ink the rose with the Calypso Coral ink, stamp 0off on a piece of scrap paper to mute the color, and stamp onto the glossy cardstock. Repeat and stamp two more times.
8. Take the smaller leaf stamp and ink with the Perfect Plum ink. Stamp onto the glossy cardstock.
9. Use your sponge inked with the River Rock ink and ink around the edges again and into the middle.

I just LOVE the look of distressed glossy cardstock! It's so pretty and vintage!
Like I said if you have any questions about measurements or anything else on this card please let me know! You can comment below or send me an email at aprilmassad@yahoo.com!
To order any of the supplies mentioned above you can contact your Stampin Up demonstrator or go HERE to shop online.
My next card share will be another glossy cardstock card! Fun fun!
Enjoy your Friday!

Thursday, July 14, 2011

1 Card...3 Cardstocks

Hello everyone!! Long time no see!
Today I thought I would do a little cardstock comparison. It's something I talk about at every card class and something that every stamper should explore!
Now for this comparison I am only going to compare 3 basic types of SMOOTH cardstock. I'm not trying to leave out poor textured cardstock because he has his place in papercrafting too, but he isn't the best choice when stamping! We want a good smooth surface when stamping so that our image comes out nice and clean!
Below you will see photos of 1 card with the 3 types of smooth cardstock I'll talk about today!
Discount Cardstock:
When I say discount I mean the cardstock that is thinner and cheaper than Stampin Up's Whisper White cardstock. It's the cardstock you pay less for at Wal-Mart or Hobby Lobby.
While it has it's purpose, it does not give you a beautiful stamped image. When you stamp on the discount cardstock it isn't your fault that the image doesn't come out perfect or that the ink isn't as rich and colorful. It's just the paper!
Like I said it does have it's purpose! It's great for scrap paper or projects you don't stamp on! Practice makes perfect so practice on the discount paper!
Whisper White:
Whisper White is my most favorite cardstock to stamp on hands down. The weight is perfect. It isn't too heavy to use a punch with, but it's heavy enough to give you a beautiful, rich stamped image! The stamped image is cleaner and you really see how beautiful and rich your ink colors are!
Glossy White:
Some people consider Glossy White cardstock a specialty cardstock like watercolor paper. I put it in the category of cardstock because it is perfect to stamp on! It gives your stamped images a brighter almost cartoon or 3d look. The glossy finish gives a a fancy or store bought sheen!
Besides stamping on it there are SO many different ways to use glossy cardstock. In future posts I'm going to show you several different ways to use this product!

Tip: Always make sure that you use the same type of cardstock to stamp on that you use to make your sentiment. Different cardstocks look different when next to each other! Your project will look better when your sentiment cardstock matches your stamped cardstock!

To purchase the products mentioned above contact your Stampin Up Demonstrator or go HERE.

Supplies used above:
- Flower Stamps: Array of Sunshine
- Ink: Riding Hood Red and Night of Navy
- Cardstock: Whisper White, Glossy White, Riding Hood Red, Night of Navy
- Sentiment Stamp: Something to Celebrate
- Modern Label Punch

It's always interesting to me to see different products compared! It gives you a better idea what you like and might spark some creativity!
If you have any questions please send me an email at aprilmassad@yahoo.com!
Enjoy your Thursday!